Mapy.cz High Quality Map Extractor
Published 2024-09-19, updated 2024-09-21.Contents
Introduction
This small project enables you to generate high quality images covering a large area from the well established czech server mapy.cz.
These maps are known for their detail and reliability, making it useful to have a printed version. Using the native export method was not sufficient for me, as it exports only the portion of the map displayed on the screen, which is too small. Zooming out displays a large portion of the map, but the level of detail decreases. Therefore I came up with the idea of stitching together multiple screenshots of the map at a detailed level into a single high quality image of the map.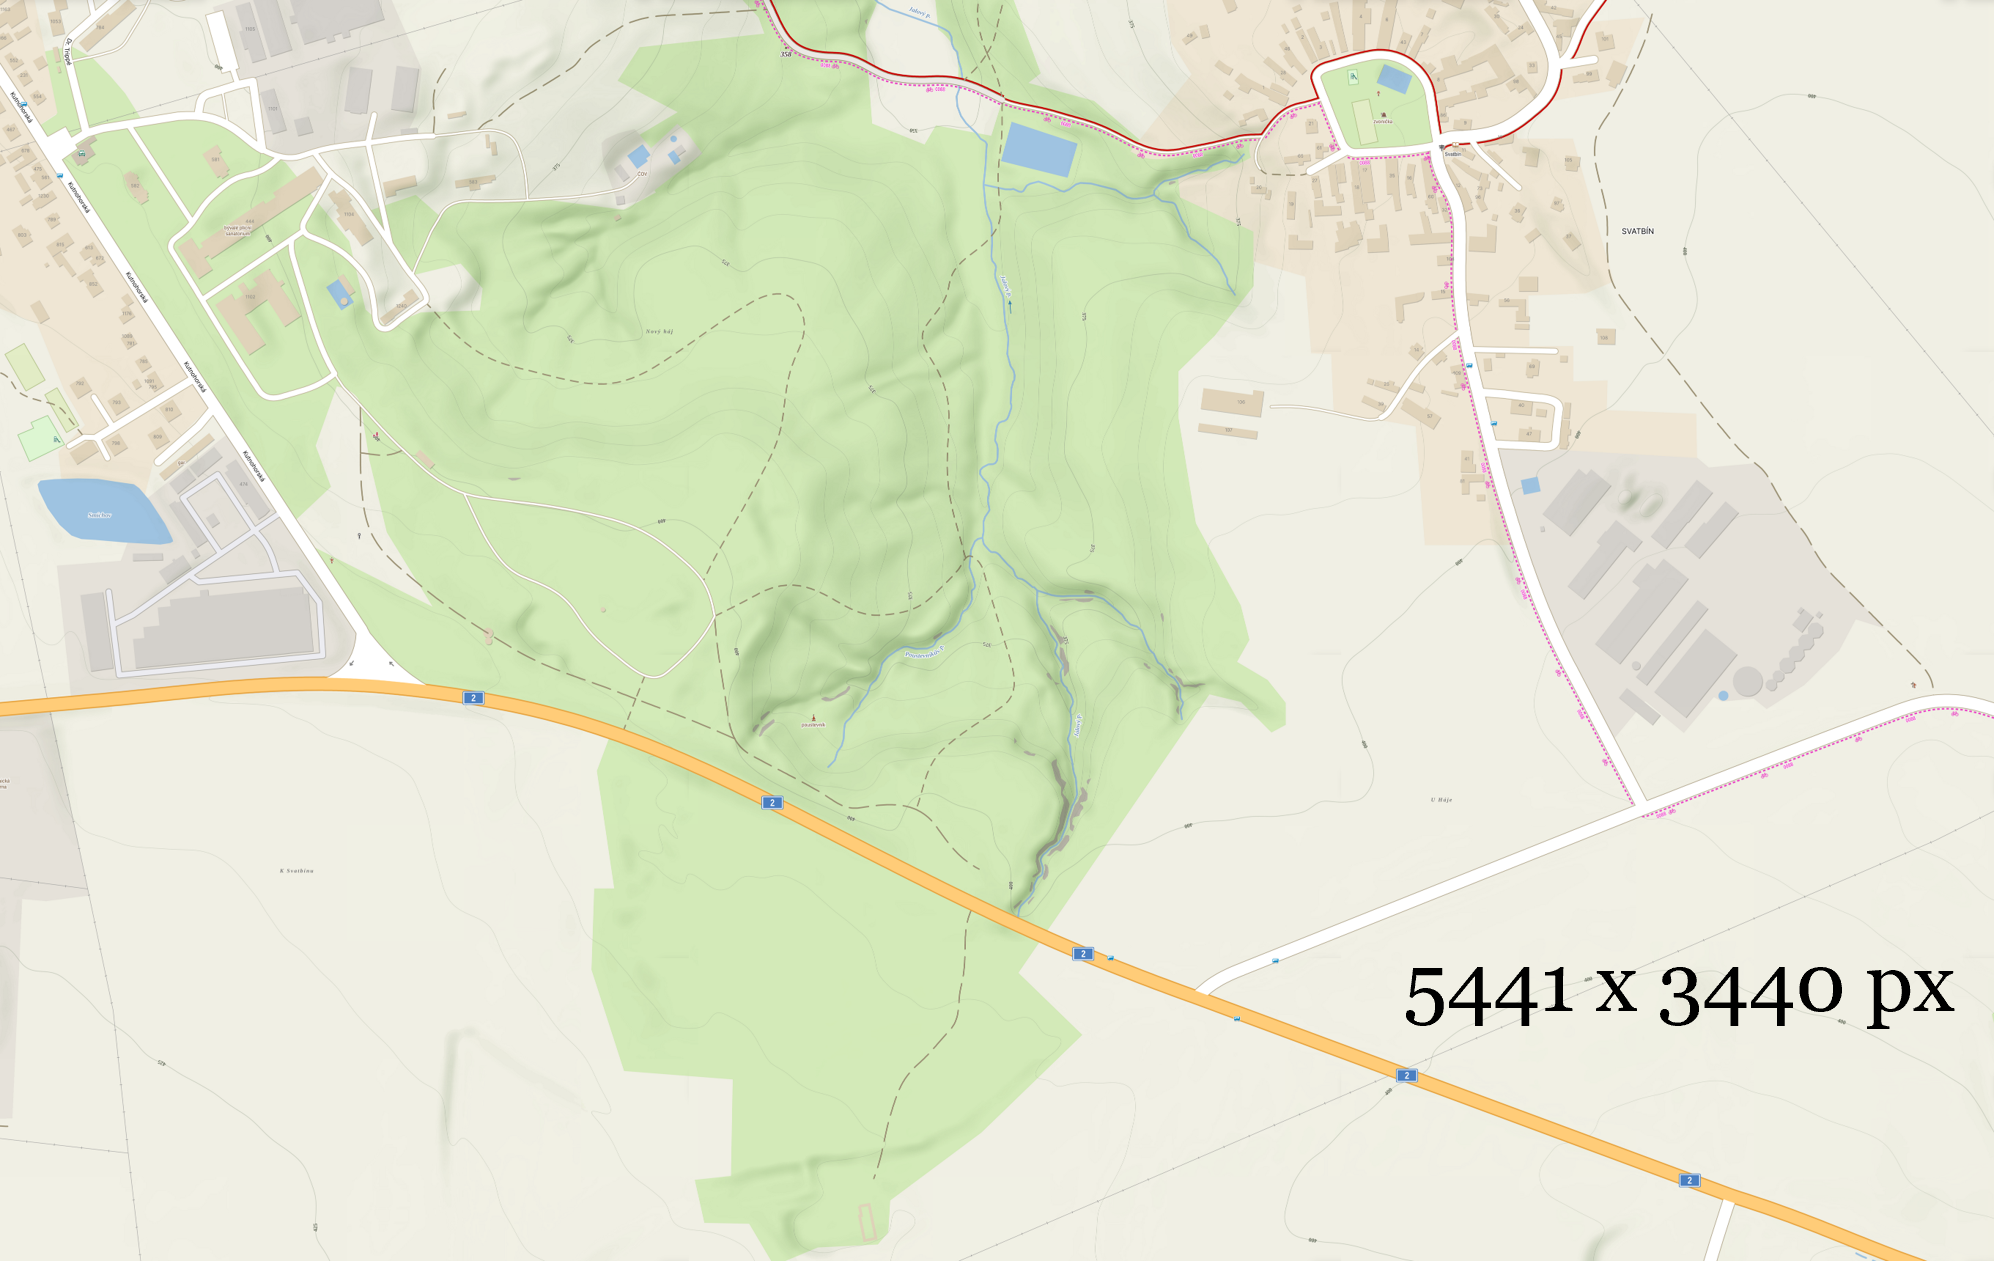
The working principle is simple:
- The user sets the starting point, area and zoom level of the map he wants to have saved.
- The area is divided by a grid pattern, where each of the neigbouring grid cells partially overlap.
- A programmatically controlled browser session, with tha map open, is started. Each cell of the map grid is visited, and a screenshot is captured.
- The screenshots are automatically stitched together into a single large image of the map.
I tried to make the configuration and setup as simple as possible for any user, but you'll probably need at least a tiny bit of experience with Python or a certain degree of dedication, to get it to work.
Downloads
- main.py - Main code file.
- requirements.txt - List of required Python packages.
Requirements
- Python installed (I used Python 3.11, but probably any Python 3 will do).
- Firefox web browser.
- Geckodriver for Firefox installed and added to PATH.
- Python packages listed in requirements.txt.
pip install -r path/to/requirements.txt
Selenium is used to control the browser and it requires a web driver and python package to be installed.
If you prefer using Chrome, refer to instructions forsetting up Selenium with Python for Chromeanywhere online.
Configuration
WARNING: The code is written to work with a single display at a resolution of 1920 x 1080 pixels. I recommend you turn down your screen resolution, in case your resolution is higher and disconnect your secondary display. Otherwise, you'll have to re-configure the rest of the variables according to the comments in code, which might be a bit more difficult.
In the beginning of the python script main.py, there are multiple variables written in CAPITAL case, which are meant to be configured. For basic usage you'll need to configure just these:
- ZOOM_LEVEL - States the zoom level, at which the map is supposed to be taken.
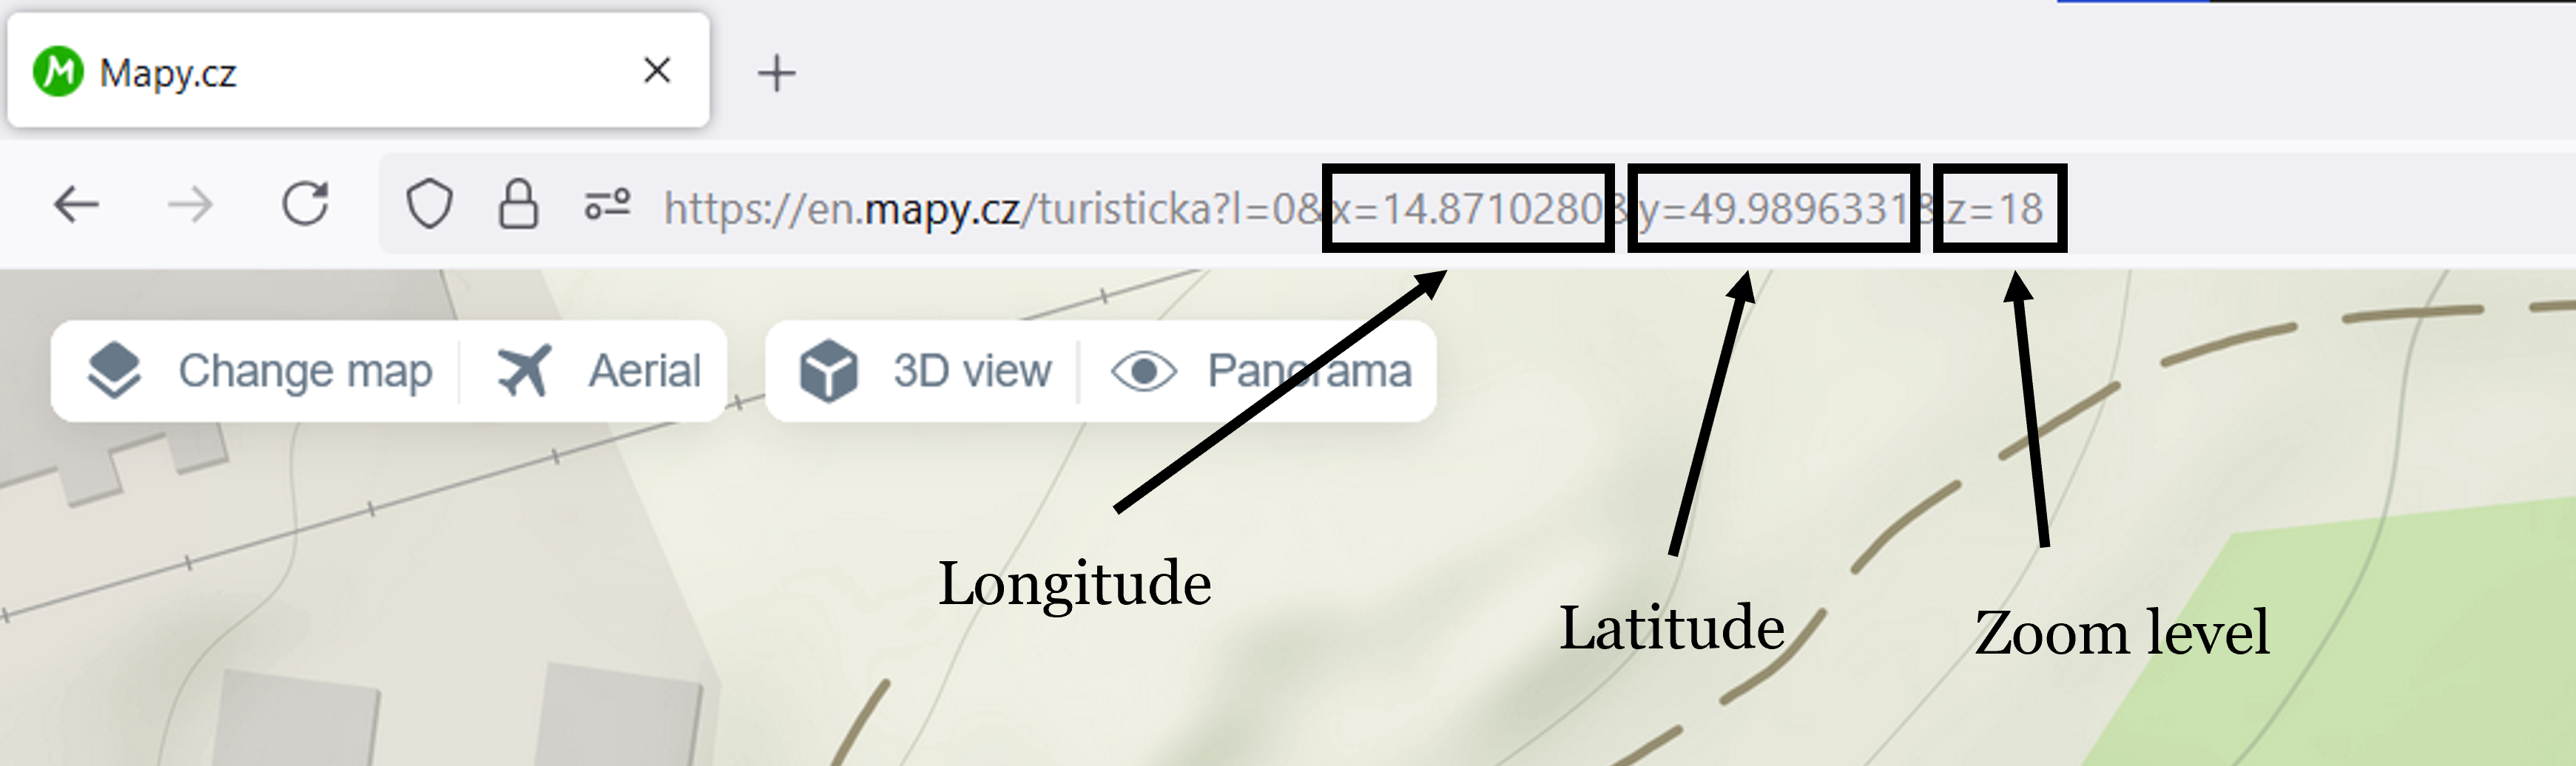
- TOP_LEFT_COORDS_LL - States the (longitude, latitude) coordinates of the top left part of the map to be generated.
- MAP_AREA_M - Area of the final map in meters (horizontal, vertical).
- SNIP_REGION - Screen region, which has an unobstructed view of the map, without UI elements. Defined by the top-left and bottom-right corner (x1, y1, x2, y2). Try first with the default value (0, 60, 1880, 1020).
- MAP_SNIPS_DIR - Path to directory, in which the map snippets will be saved.
- FINAL_MAP_PATH - Path where the final image file will be saved.
- WEB_BROWSER - Web browser you use, either "firefox" or "chrome".
- WEB_BROWSER_PATH - Path to the web browser binary (.exe).
Instructions for basic usage
After configuring the variables, do the following:
- Run the python script main.py in terminal.
- An automated browser window will open. You have 10 seconds (SETUP_WAIT variable) to do the following:
- Set the browser window to full-screen mode (keyboard shortcut F11).
- Once the site https://mapy.cz loads, close the notification about cookies, hide the search sidebar on the right and hide any other elements, which could obstruct the view of the SNIP_REGION.
- Move the mouse to the bottom right corner of the screen, so it doesn't obstruct the SNIP_REGION.
- Rest until the map snippet collection is complete and the automated browser session closes. While waiting, don't do anything (don't switch windows, don't move the mouse, don't press any keys.)
- Check the script's output in terminal to see the progress of the image stitching.
- Once the images are stitched, the path of the final image is printed in the terminal.
- In case of any problems, check the terminal output.
How does it work
Automated snippet collection
The geographic area to be mapped, defined by it's top left corner (TOP_LEFT_COORDS_LL) and rectangular area (MAP_AREA_M), is divided into a grid of partially overlapping views of the map at the desired zoom level (ZOOM_LEVEL).
The change of the map view is performed by editing the URL, which contains the desired coordinates. A map snippet is obtained by taking a screenshot, using the Python pyscreenshot package, of the defined region of the screen with an unobstructed view of the map (SNIP_REGION).
Stitching the map snippets
Given the fact the grid layout of the snippets is known and the overlapping parts of two images are almost identical, I put together a simple algorithm. The horizontally adjacent images are stitched together one by one into a row, and the rows are then vertically stitched together to form the final image. Although the relative positions of the images are known, the exact size of the overlapping area between horizontally and vertically neighboring images must still be determined.

For example, the size of the overlap of horizontally neighbouring Image A and Image B is determined by sliding a window across image B from left to right and selecting the window that is most similar to the base window of Image A. The window is then used to crop the Image B and the images are horizontally concatenated to form the stitched image.
I decided to implement my own stitching algorithm after trying to use some publicly available image stitching packages, because they are overly complicated and didn't really perform well on the simple problem, as they are primarily made for stitching real photos with imperfections and unknown relative positions. Configuring those packages for this specific task seemed more complex than creating my own solution.
Troubleshooting
- I wrote this on a Windows machine, so there might be some issues on other operating systems. If that seems the case, you'll have to modify the procedure/code accordingly.
- If the browser doesn't load the map fully before screenshots are taken, resulting in incomplete images, increase the MAP_LOAD_WAIT variable in the code.
- The code is designed to work with a 1920x1080 resolution. If your display has a different resolution, adjust the SNIP_REGION variable to fit your screen or reduce your resolution temporarily to match. Disconnect any secondary displays to avoid confusion.
- If there seems to be overlap smaller then MIN_HOR_SNIP_OVERLAP or MIN_VER_SNIP_OVERLAP variable, decrease the variable value.
- Any other problems displayed in the terminal output can be proably solved by reading the error message and looking up the problem online.
- If there are no problems displayed in the terminal output, but the final image is not generated correctly, you'll have to analyse and understand the code to find the problem.